SFTP & Data Transfer
Introduction
Welcome to the SFTP Guide! This guide is designated to help you navigate initiating a SFTP session with ease for a seamless experience.
What is the SFTP?
SFTP (Secure File Transfer Protocol) is a way to safely send and receive files over the internet. Think of it like sending a package through a secure courier instead of regular mail.
- Secure: It locks your files with encryption, so no one can peek at them while they travel.
- Like a Safe Deposit Box: You need a key (password or special code) to access the files.
- Reliable: It ensures files arrive complete without being damaged or altered.
- Used for Important Transfers: Businesses use it for sensitive data, like financial records or personal information.
So, if regular file transfer is like sending a postcard, SFTP is like using a locked, tamper-proof package!
Getting Started
First things first, you will need a SFTP client.
An SFTP Client is a software application that allows you to securely connect to an SFTP server to transfer files. Think of it as a special mailbox that lets you send and receive files safely over the internet.
How It Works (Simple Explanation)
- You open the SFTP client.
- You log in using a username and password (or a special key).
- You can upload (send) or download (receive) files.
- Your files travel securely so no one else can see or change them.
Example Uses
- A company shares confidential documents with employees.
- A website owner uploads files to a server.
- A business backs up important data to a secure location.
Popular SFTP Clients
- WinSCP (Windows-friendly)
- FileZilla (Easy to use)
So, an SFTP Client is like a secure file mover that helps you safely transfer important files between your computer and a remote server. 🚀
This guide will walk through the use of WinSCP but the steps are similar for most clients.
WinSCP

- Double click the file that was downloaded.
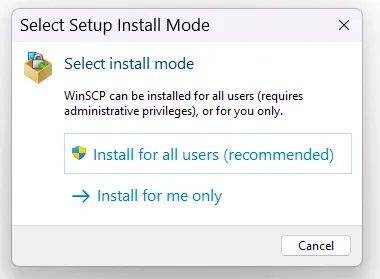
- A window will popup requesting you to select an Install Mode. We will be choosing "Install for all users (recommended)
- When prompted: "Do you want to allow this app to make changes to your device?" Select "Yes"
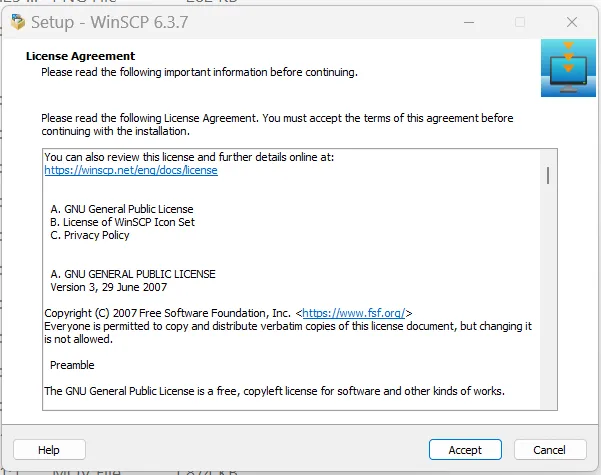
- The next screen will be the License Agreement. Choose "Accept" to continue with the software install.
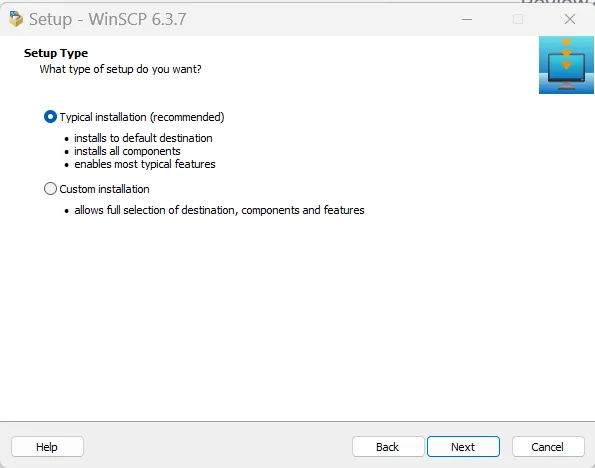
- The next window asks which "Setup Type" you want. Select "Typical installation (recommended)" and click "Next".
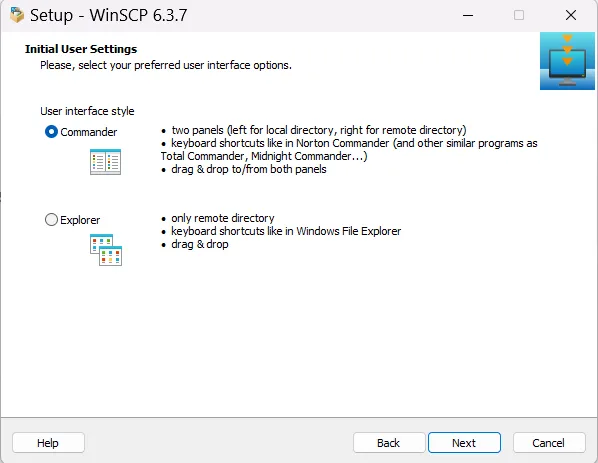
- For the "Initial User Settings" we suggest selecting "Commander" for use with this guide. Then click "Next".
- Finally, we're ready to install. Click "Install".
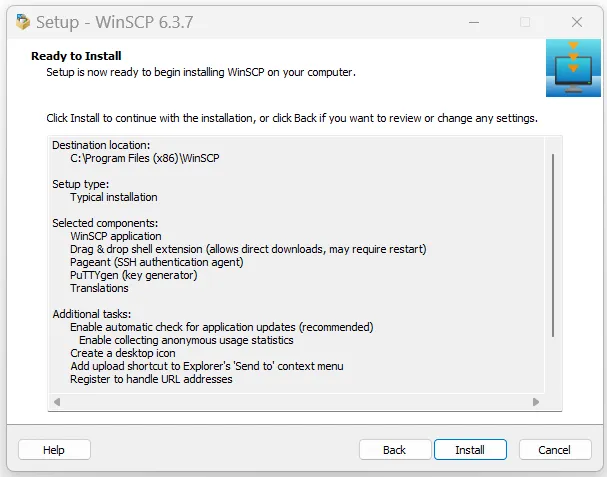
- We have now completed the installation of WinSCP. If you leave the "Open Getting started page" option selected, when you click finished you will be taken to a webpage with detailed information for using WinSCP. We will provide basic instructions in this guide.
Now that you have the SFTP Client installed, you are ready to use your username and password to log in. If you don't already have an account set up, you will need to complete the DFS SFTP Account Request Form before going any further.
Username and Password
- When you open the WinSCP application you will see the following login screen:
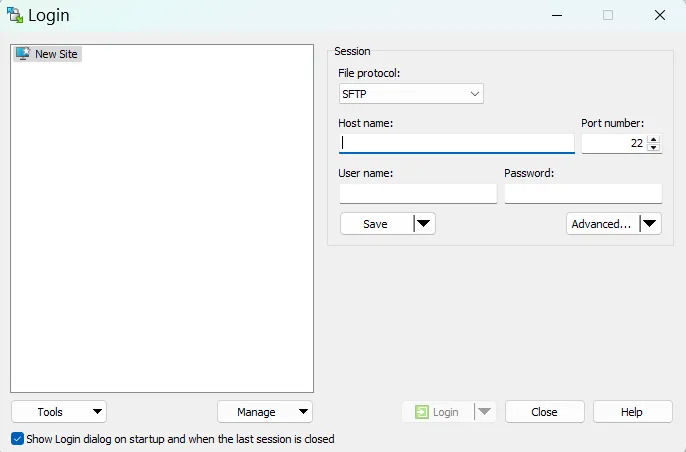
- The SFTP Host Name for DFS is: dfs-sftp-lb.dfsmail.com. Always use Port number: 22 and enter your assigned Username and Password.
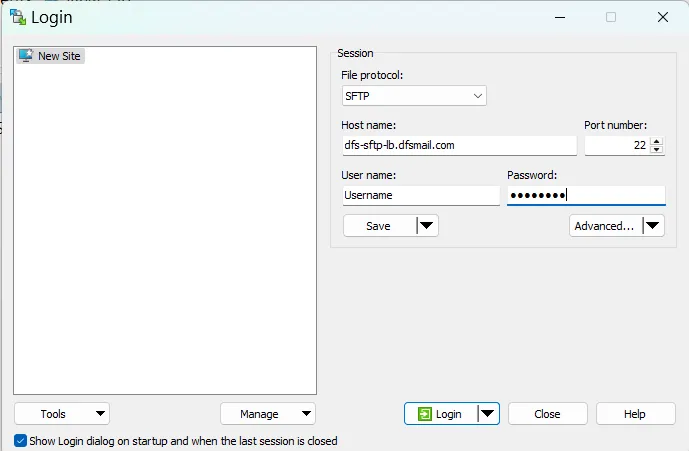
- If you would like to save your Host name and Username you can do so by clicking "Save". Feel free to change the "Site name" here. You can give this a name that will be memorable for you. Once you click "OK", this will be available on the left side of your screen. The next time you log in, you can select it to populate this information. For security, we don't recommend choosing the option to "Save password".
- Now you are ready to click "Log In." Once you're logged in, you will see a screen that looks similar to this and you're ready to proceed with transferring files. If you received an error message, please proceed to troubleshooting where we will walk through some of the most common issues our customers encounter.
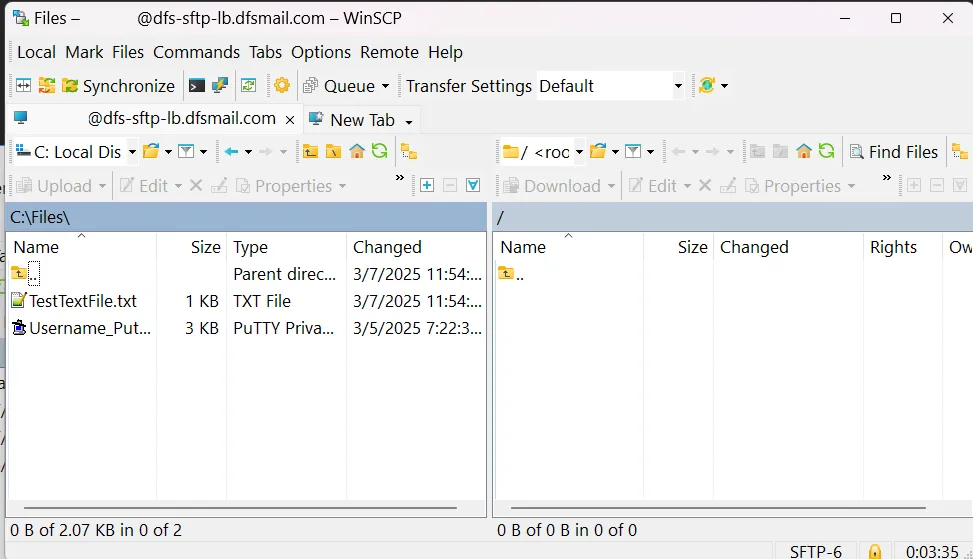
Let's start by familiarizing ourselves with the screen. As you can see, the bulk of the application screen is split in half. On the left you will see a folder location on your computer. The right shows the folders and files on the SFTP server.
In this example, there are 2 files on the computer used to log in to SFTP and there isn't anything in the SFTP directory.
The first thing we are going to do is navigate to the location of the file we want to move and, in the opposite pane, we will navigate where we'd like to place the file. Remember, the left side is your computer and the right side is the SFTP directory.
If you are having difficulty using the interface to navigate to a file location, try clicking the "Open Directory" icon on the pane where you are trying to navigate and clicking Browse. This interface may be more familiar.
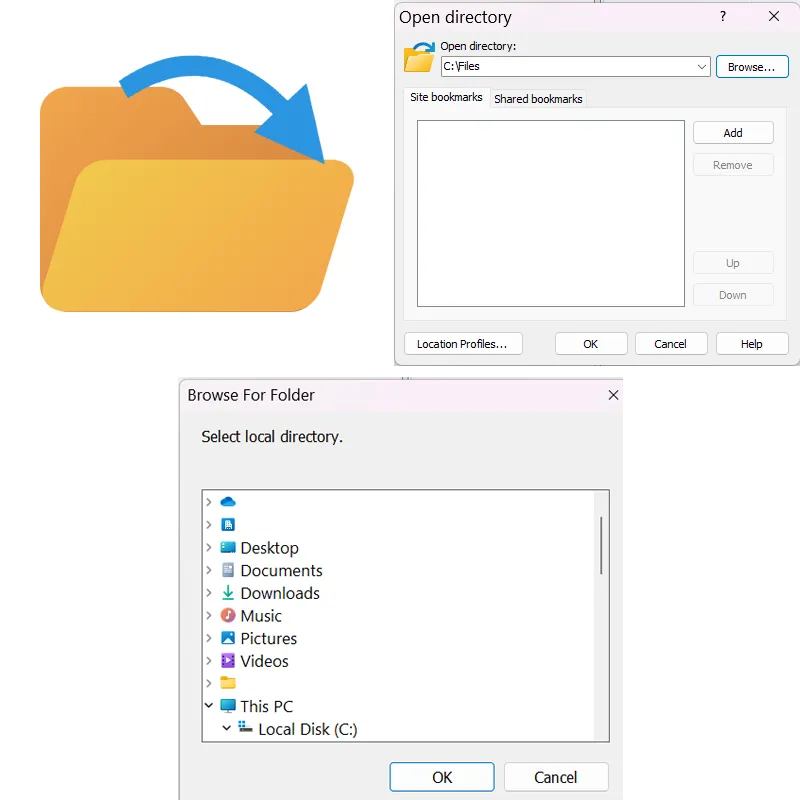
When you have navigated to where the file is located as well as where you'd like to place the file, transferring files is as simple as double-clicking or dragging the file icon to where you want it to go.
When the file is copied, you will see it appear in the pane where you copied the file to.
FileZilla
We recommend WinSCP or Filezilla. We will use Filezilla for this portion of the guide. If you are using an operating system other than Windows then Filezilla or another client will be the better choice for you.
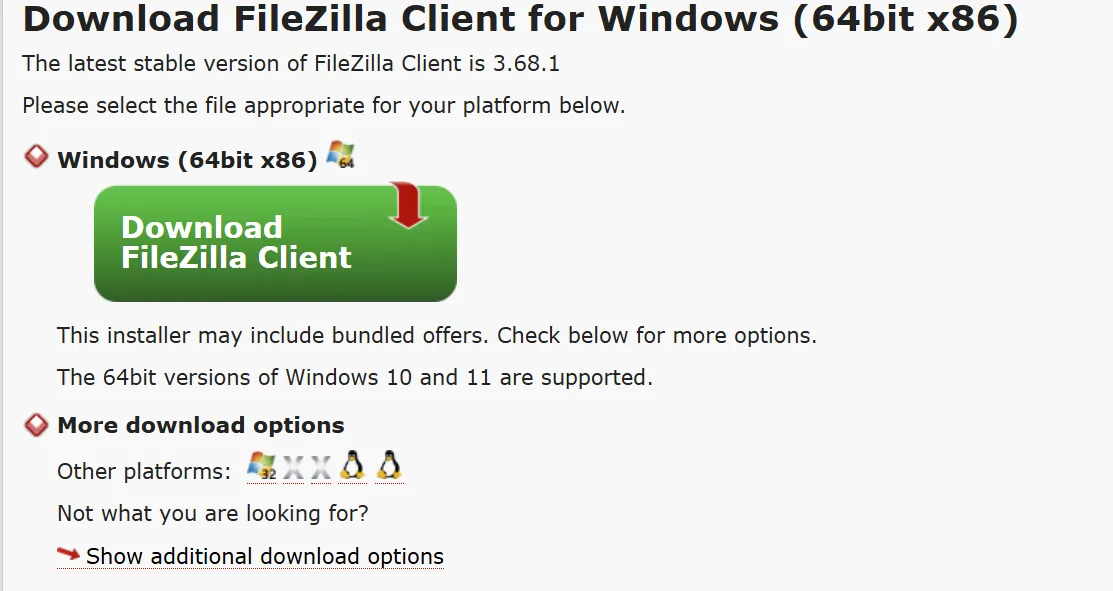
After clicking the link for Filezilla, you will click the green "Download FileZilla Client" button if you have a Windows PC. If you are using a different operating system, click the link below where it says "More download options".
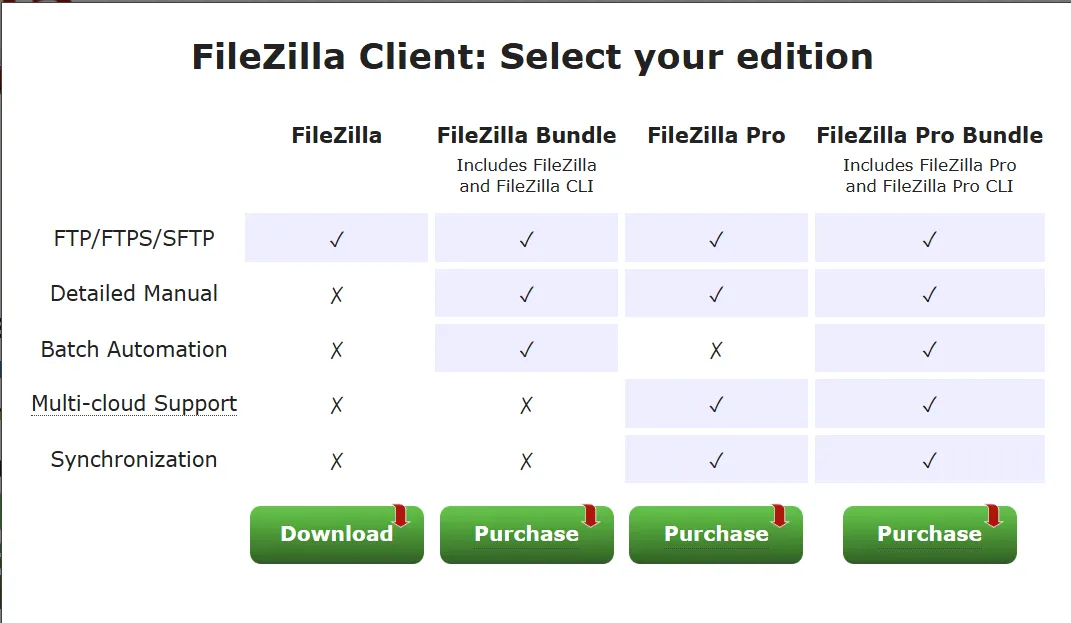
Next you will select your edition. For this tutorial we selected the first option which is the FileZilla free version.
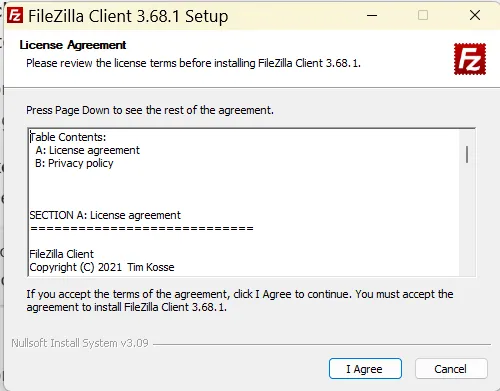
Next you will need to agree to the license agreement.
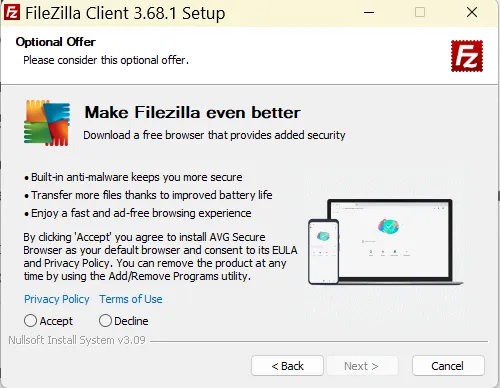
You will be presented with an additional offer. This is not necessary so you can select "Decline" and click next.
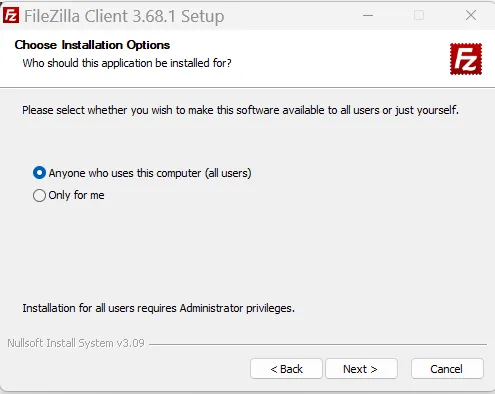
- Double click the file that was downloaded.
- A window will popup will install options. With this tutorial we selected the first option "Anyone who uses this computer (all users)
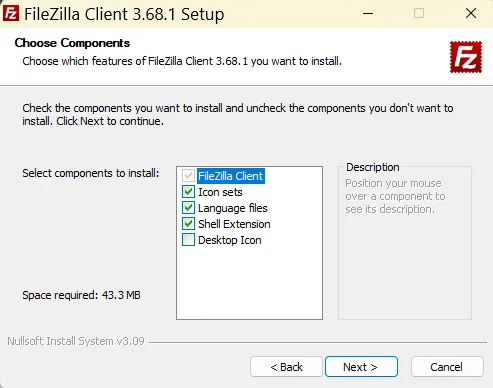
- Next you will be prompted to choose components. Choose the ones that make sense for you and your organization.
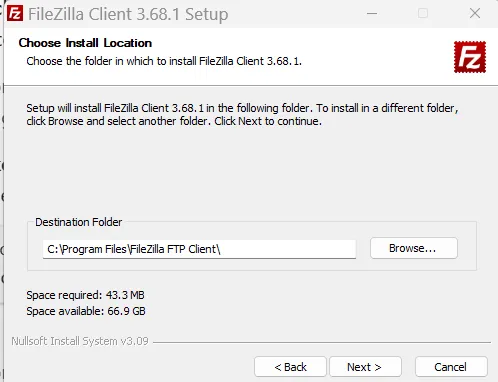
- Your next window will request your install location. We used the default location.
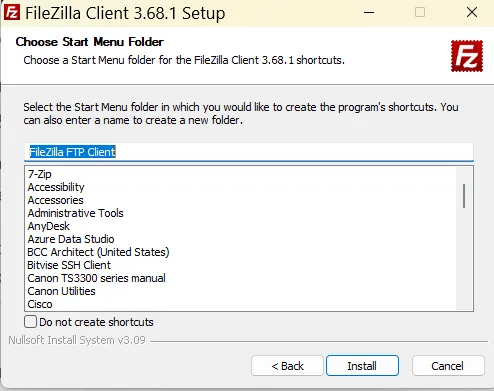
- The next window will ask you to choose the Start Menu Folder. We kept the default suggestion.
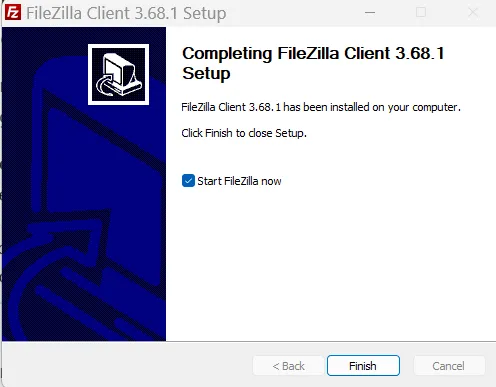
- Once you have reached this window, click "Complete" and you will have completed the installation of FileZilla
Now that you have the SFTP Client installed, you are ready to use your username and password and/or key to log in. If you don't already have an account set up, you will need to complete the DFS SFTP Account Request Form before going any further.
- When you open the FileZilla application you will see the following a place for login information. If you are logging in using a password and don't have a need to save the host information then Quickconnect may be a good option for you. Enter dfs-sftp-lb.dfsmail.com for your Host along with your username, password and the Port number of 22. Then click Quickconnect.

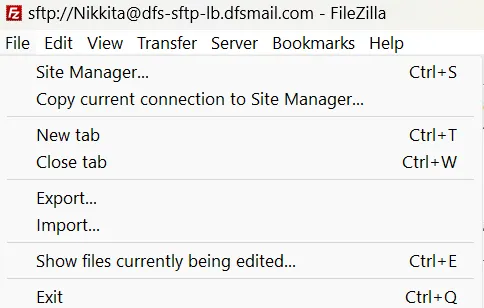
- If you plan to log in regularly and wish to save the Hostname and Port Number, the following option will be a better option for you. Select File and navigate down to Site Manager.
- Next, click "New site" at the bottom of the screen.
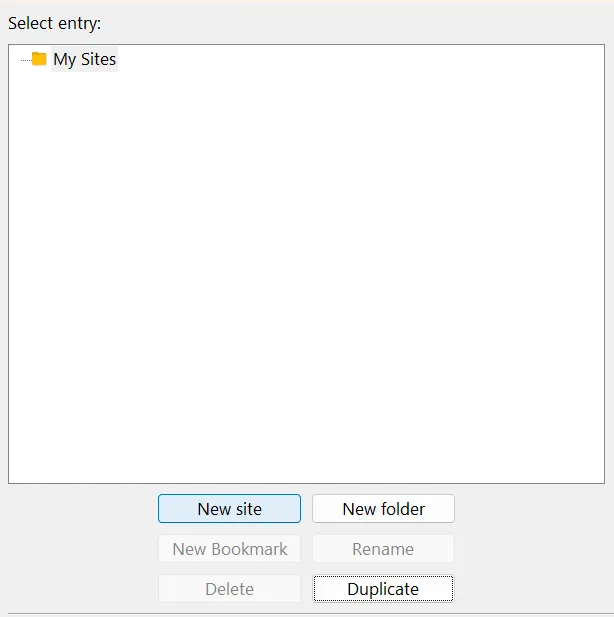
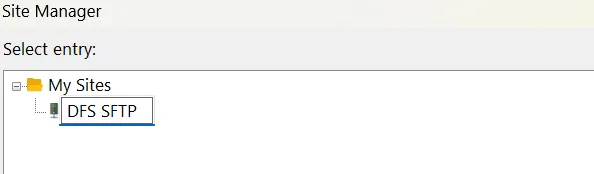
- The new site will be labeled "New site". You can type over this name. Choose a name that makes sense for you. In this example we named the site "DFS SFTP".
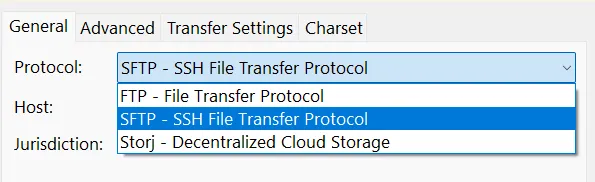
- At the top of the right pane you will see a drop down for "Protocol". Select "SFTP - SSH File Transfer Protocol".
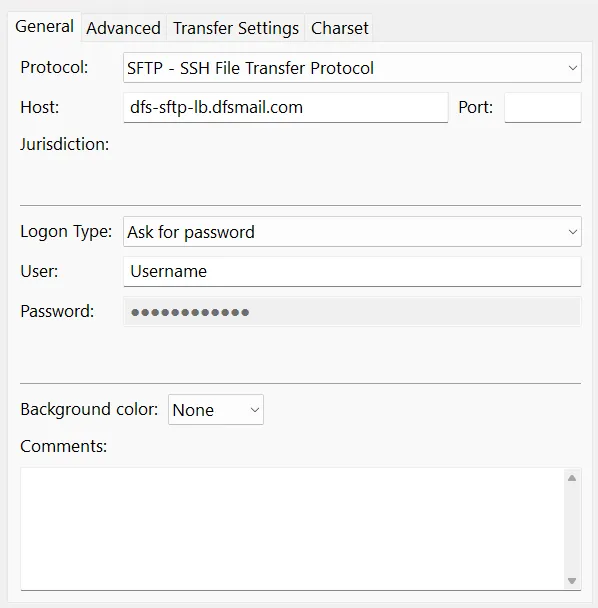
- Enter Host: dfs-sftp-lb.dfsmail.com and Port: 22. If you are using a Username and Password set your "Logon Type" as "Ask for Password". If you are using a public key select "Key file". For either option, enter your username where it says "User:".
- If you selected "Key file", click "Browse..." to navigate to your key file.
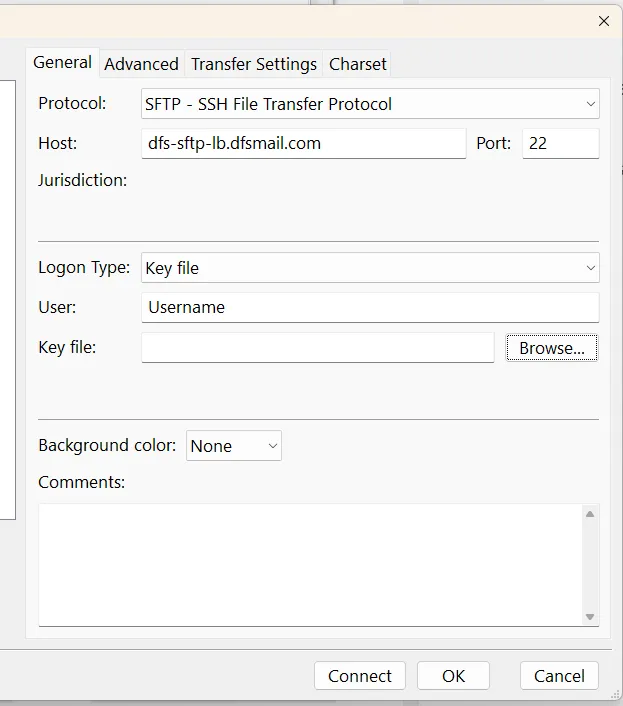
- Click "Connect". If you are using a password, you will be prompted for your password.
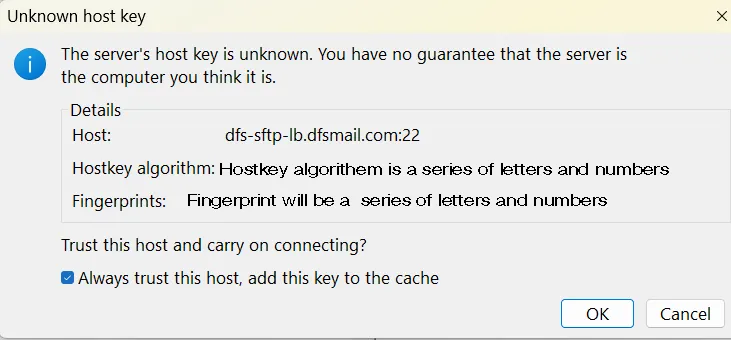
- You may be presented with a screen similar to the one pictured below. To avoid having this popup each time you login, ensure "Always trust this host, add this key to the cache" is selected and click "OK".
- If you received an error message, please proceed to troubleshooting where we will walk through some of the most common issues our customers encounter.
Transferring Files
Let's start with familiarizing ourselves with the screen. As you can see, the bulk of the application screen is split in half. On the left side you will see a folder location on your computer. The right shows the folders and files on the SFTP server. In this example, there are 2 files on the computer used to log in to SFTP and there isn't anything in the SFTP directory.
The first thing we are going to do is navigate to the location of the file we want to move and in the opposite pane, we will navigate where we'd like to place the file. Remember, the left side is your computer and the right side is the SFTP directory.
If you are having difficulty using the interface to navigate to a file location, try clicking the "Open Directory" icon on the pane where you are trying to navigate and clicking Browse. This interface may be more familiar.
Let's start with familiarizing ourselves with the screen. As you can see, the bulk of the application screen is split in half. On the left side you will see folder locations and files within a selected directory on your computer. The right shows the folders and files on the SFTP server. In this example, there are 2 files on the computer used to log in to SFTP and there isn't anything in the SFTP directory.
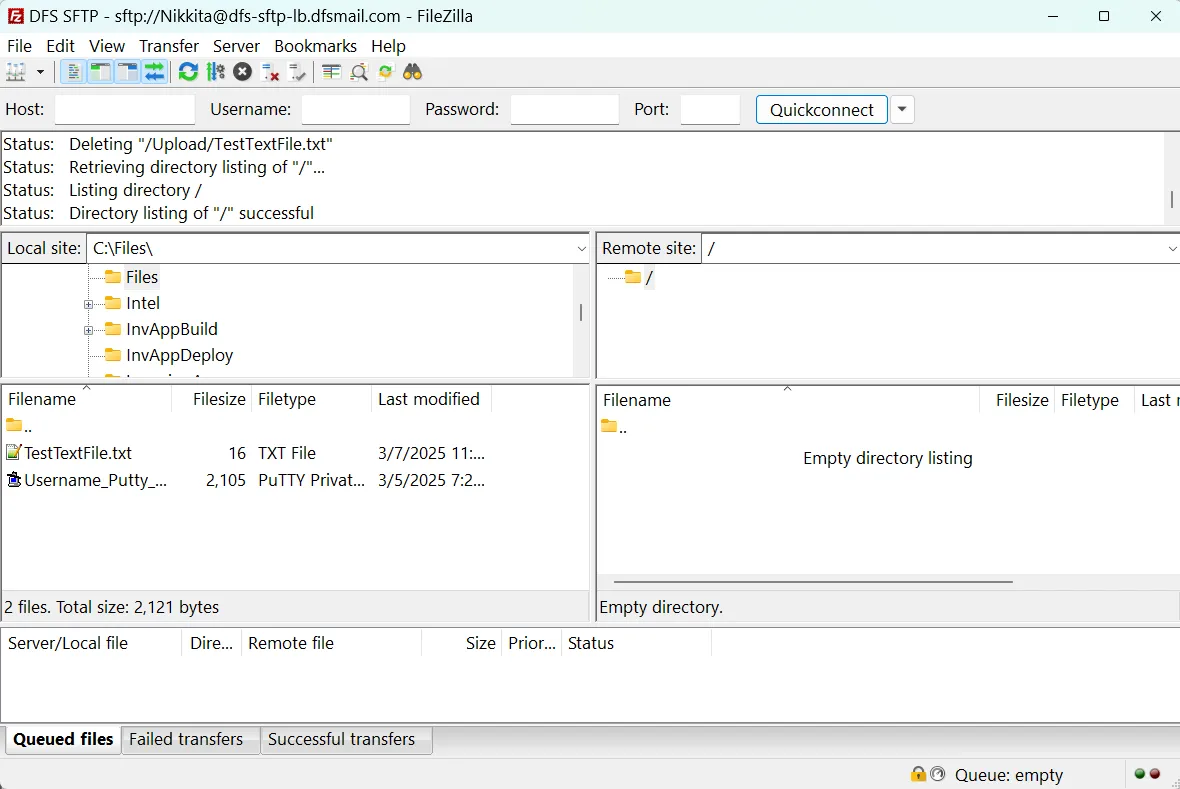
The first thing we are going to do is navigate to the location of the file we want to move and in the opposite pane, we will navigate where we'd like to place the file. Remember, the left side is your computer and the right side is the SFTP directory.
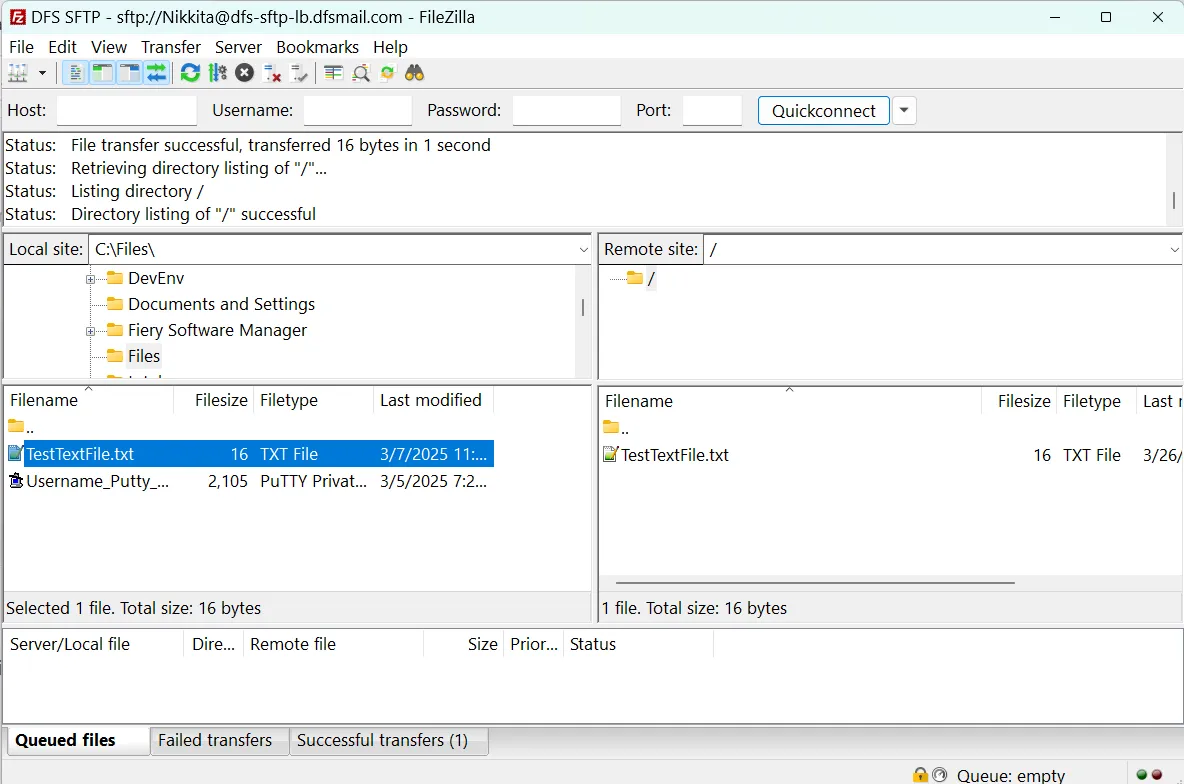
When you have navigated to where the file is located as well as where you'd like to place the file, transferring files is as simple as double clicking or dragging the file icon to where you want it to go.
When the file is copied, you will see it appear in the pane where you copied the file to.
Troubleshooting
Double check your Host Name
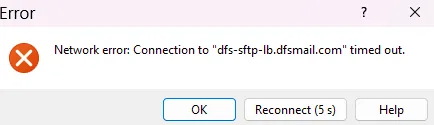
Make sure you are connecting to dfs-sftp-lb.dfsmail.com
If there are any typos then you will be unable to connect.
Are you using Port Number 22?
You must set the port number to Port 22. Any other numbers would likely result in this error.
Has your Public IP address changed?
There are several scenarios that could cause a public IP address to change. If your public IP address has changed then a ticket will need to be submitted to DFS to update your Public IP address. Here are some of the most common things that can cause a person's public IP Address to change
- Dynamic IP Assignment (Most Common)
- Internet Service Providers (ISPs) often assign dynamic IP addresses using DHCP (Dynamic Host Configuration Protocol). This means that when your modem/router reconnects or after a certain lease time expires, the ISP may assign a new IP address.
- Modem/Router Reboot
- Restarting your modem or router can sometimes result in a new IP address, especially if your ISP assigns IPs dynamically.
- ISP Network Changes
- ISPs may periodically reassign IP addresses for network optimization, load balancing, or maintenance.
- Power Outage or Network Disruption
- If your connection is interrupted due to a power outage or ISP maintenance, your modem/router may get a different IP address when it reconnects.
- Switching Networks or ISPs
- If you connect to a different network (e.g., moving from home Wi-Fi to a mobile hotspot), your public IP address will change.
- Using a VPN or Proxy A Virtual Private Network (VPN) or proxy server can mask your real IP and provide a different public IP address.
Still having problems or your cause isn't listed?
Have you double checked everything and your issue is still not resolved? We're here to provide more advanced support to resolve your error. Please submit a support ticket by emailing Account Services.
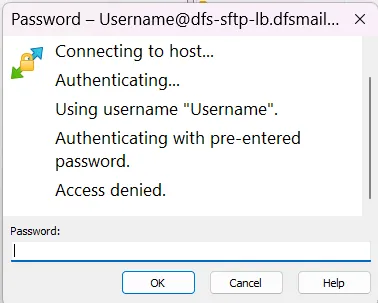
This error is usually caused by incorrect credentials. Check the following:
Double check your username
This may sound simple but even the most insignificant typo in a username will cause an Access Denied error.
Double check your password
If you are using a password to login, make sure it's exact. Is your Caps Lock on? Could you have possibly entered a zero instead of the letter O? The password field in WinSCP is masked, so it's hard to be sure you entered every character correctly. If you keep getting a password denied error, try copying and pasting the password into the password field to make sure you have it right.
Still having problems or your cause isn't listed?
Have you double-checked everything and your issue is still not resolved? We're here to provide more advanced support to resolve your error. Please submit a support ticket by emailing Account Services.